


The mullet is back, and it is not going away. You see it on city streets, on college campuses, and all over social media. It works on men, women, and anyone who wants a cut with attitude. The best part is that it is easier to cut than most people think.
A mullet looks wild, but the plan behind it is simple. You work in clear zones. You cut in a set order. You keep the tension low and the lines soft. If you follow that plan, you get a clean, modern shape instead of a messy accident.
This guide walks you through every part of the process. You will learn the zones, the cutting order, and the tools that work best. You will also learn how to adjust the cut for face shape, hair texture, and skill level. Whether you are a barber, a stylist, or a first-timer with a pair of scissors, you will find a clear path here.
One quick note before we start. The headline says four steps, but the full method has five short stages. The first four build the shape. The fifth one blends it. Do them in order and you will be fine.
A Mullet Is Four Zones, Not One Length
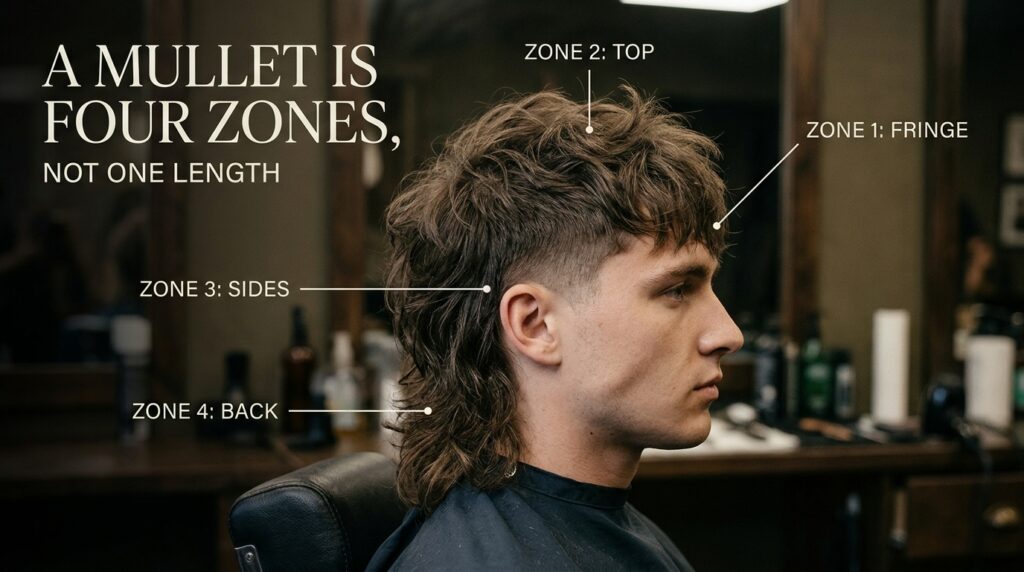
Most people think of a mullet as “short in front, long in back.” That is only half the story. A good mullet has four separate zones. Each zone has its own job and its own length. When you see the cut this way, it stops feeling scary.
Think of the head like a house with four rooms. You decorate each room on its own. Then you connect the rooms with a hallway. That hallway is the blend.
Here are the four zones and what each one does.
| Zone | Where It Sits | Its Job |
| Fringe | Front hairline and forehead | Sets the shortest length and frames the face |
| Top | Crown and upper head | Adds shape, volume, and texture |
| Sides | Over and around the ears | Creates the “short” half of the mullet |
| Back | Nape and neckline | Holds the length that makes it a mullet |
The fringe and top belong to the “business” side of the cut. The sides act as a bridge. The back is the “party.” Each zone must agree with the others. If one zone is too long or too short, the whole cut looks off.
Many bad mullets come from one mistake. The person treats the head as a single piece. They cut the back first, then guess at the rest. The result is a back that is too long and a top that is too flat. When you plan by zone, you avoid that trap.
Before you cut, look at your hair in a mirror. Decide how long you want each zone to be. Write the numbers down if it helps. A simple plan might be a 2 inch fringe, 3 inch top, tight sides, and a 6 inch back. Plans like this keep your hands steady and your cut balanced.
The Cutting Order That Prevents Most Mullet Mistakes
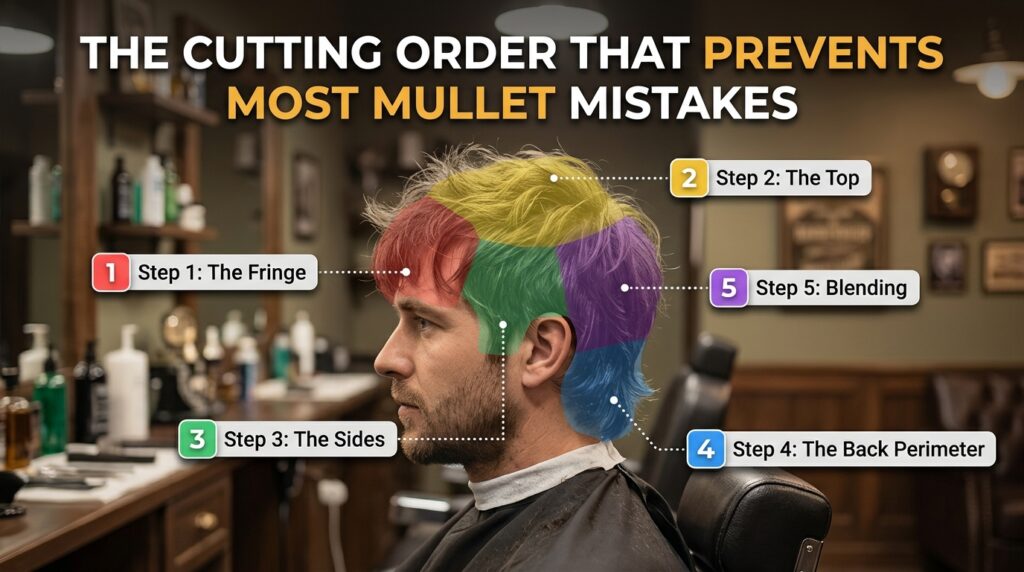
Order matters more than skill. A beginner who cuts in the right order will beat an expert who cuts at random. The reason is simple. Each zone sets a guide for the next one. If you start in the wrong place, you have nothing to match against.
The best order goes from front to back. You start with the shortest area and move toward the longest. This keeps you from cutting too much by accident. It also lets you stop early if you change your mind.
Always cut on hair that is clean and damp, not soaking wet. Wet hair stretches. When it dries, it shrinks and jumps up. This is called shrinkage, and it can ruin a cut. Damp hair gives you a better preview of the final length. Curly hair shrinks the most, so leave extra length on purpose.
Gather your tools before you start:
- Sharp haircutting shears (not kitchen scissors)
- Thinning or texturizing shears
- A fine-tooth comb
- Sectioning clips
- A spray bottle with water
- Two mirrors, so you can see the back
- Clippers with guards (optional, for the sides)
Keep your tools clean and sharp. Dull blades fold the hair and leave split, ragged ends. That is the fastest way to ruin a soft mullet edge.
Step 1: The Fringe Sets Every Other Length
Start at the front. The fringe is your anchor. Every other length in the cut will relate back to it. If the fringe is wrong, everything else drifts.
Comb the front hair straight down over the forehead. Decide where you want it to land. Common choices are the eyebrow, just above the eyebrow, or a soft curtain that parts in the middle. Cut a small test section first. Hold the hair between two fingers and snip upward in tiny cuts. This is called point cutting. It gives a soft edge instead of a hard line.
Cut less than you think you need. You can always take more later. You cannot put your hair back.
A few quick tips for the fringe:
- Keep your fingers flat against the forehead for a straight guide.
- Cut in the center first, then work outward.
- Check both sides in the mirror to keep them even.
- Let the hair dry a little and look again before going shorter.
Once the fringe is set, you have your shortest point. Everything else now has a clear reference.
Step 2: The Top Is Cut Straight Up, Not Toward the Back
Now move to the top of the head. This is where many people go wrong. They pull the hair back toward the rear and cut. That makes the top too long and drags the shape toward the neck. You end up with a flat helmet instead of a mullet.
Instead, lift the hair straight up from the scalp. Hold it at a 90 degree angle. Take the length from the fringe as your guide. Cut the top to blend with that first length. Work in thin sections from front to crown.
Cutting straight up gives the top lift. It also keeps the layers stacked correctly. The result is a crown that has a body and a clear shape. This is what gives a mullet its signature height.
You can leave the top a little longer than the fringe for more volume. A common choice is one to two inches of difference. If you want a sharper, punk look, keep the top short and spiky. If you want a soft, shaggy look, leave it longer and add texture.
Check your work as you go. Comb the top flat, then push it up with your fingers. If you see any long strands sticking out, trim them. Do not rush this part.
Read More: Soft Curtain Bangs
Step 3: The Sides Decide Whether the Cut Works
The sides are the heart of the mullet. They decide if the cut looks stylish or sloppy. This is the zone that separates a mullet from just long hair.
Your goal is to make the sides noticeably shorter than the back. How short depends on your taste. Some people cut the sides tight with clippers. Others keep them over the ears with scissors. Both work. The key is a clear contrast.
Use a comb to hold the hair away from the head. Cut around the ear first. Then work up and back, keeping the line smooth. If you use clippers, start with a longer guard and go shorter only if needed. A number 2 or 3 guard is a safe start for most people.
Here is a simple guide to side styles:
| Side Style | Length | Best For |
| Tight and clean | Skin to 1/4 inch | Bold, modern, punk looks |
| Medium trim | 1/2 to 1 inch | Everyday, easy to style |
| Over the ear | 2 to 3 inches | Soft, shaggy, retro looks |
Make sure both sides match. Stand back from the mirror and check. A small difference at the ear can look big from the front. If one side looks higher, fix it now, before you move on.
Step 4: The Back Perimeter Is Cut with No Tension
Now you reach the back. This is the long part of the mullet, and it needs a gentle touch. The word “perimeter” just means the outer edge of the hair at the neck. You are shaping that edge.
The most important rule here is no tension. Do not pull the hair tight when you cut. Tension stretches the hair. When you let go, it snaps back shorter and uneven. The line you cut can jump up by half an inch or more. Let the hair hang naturally and comb it without pulling.
Decide on the shape of the back edge. You have three common choices:
- Rounded: A soft curve, easy to grow out and forgiving.
- Pointed: A “V” shape that follows the neck. It is sharp and classic.
- Square: A flat line across the bottom. It looks clean but needs more care.
Point cut the ends for a soft, feathered finish. Cut in small snips instead of one big chop. If your hair is thick, take thin vertical sections and cut each one to the same length.
Keep a light touch around the neck. A few extra snips can take you from “nice” to “too short” very fast. When in doubt, wait. Let the hair dry, then check again.
Step 5: Blending Is Removing Corners, Not Cutting New Lengths
The last stage is blending. This is where the four zones become one haircut. Many people think blending means cutting more hair. It does not. Blending means smoothing the sharp corners where zones meet.
Look for hard lines. You will usually find them where the top meets the sides, and where the sides meet the back. These spots look like steps on a staircase. Your job is to turn those steps into a slope.
Use a comb and your shears. Hold the comb flat and slide it along the hard line. Snip off only the hair that sticks out past the comb. This is called scissor over comb. It removes corners without changing the main lengths.
Thinning shears also help. Use them once or twice at the mid-length of the hair, not at the ends. This takes out bulk and softens the transition. Do not overuse them. Too much thinning makes hair look stringy.
When you are done, shake your hair out and look from all angles. A good blend looks natural. You should not be able to point to the spot where one zone ends and another begins.
How to Cut Mullet Woman

A mullet on a woman can look soft, edgy, or both. The shape is the same, but the details change. Women often want more face framing and a softer line at the sides.
Start with long layers in the front. Cut a curtain fringe or wispy bangs. Leave more length around the face than a typical men’s cut. Keep the sides longer, around the jaw or chin, so they blend easily into the back. Then add length at the nape for the classic party-in-the-back effect.
Many women prefer a “shullet,” which is a shag and a mullet mixed together. It has more layers all over and less contrast between the sides and the back. It is a great choice if you want the trend without the shock.
Key points for women:
- Keep the front soft and face framing.
- Use longer side lengths for an easy blend.
- Add texture with point cutting, not hard lines.
- Pick a back length that suits your styling habits.
If you wear your hair down most days, a longer back looks fuller. If you tie it up often, go a bit shorter so it does not droop.
How to Cut a Mullet with Scissors

Scissors give you the softest result. They are the best tool for a natural, textured mullet. They also give you more control than clippers, especially around the fringe and the back.
Use real haircutting shears. They are sharper and thinner than household scissors. Hold the hair between your fingers and cut small sections. Point cut the ends to avoid a blunt edge. Cut a little at a time and check often.
Scissors work best when you use these three moves:
- Point cutting: Snip into the ends at an angle for softness.
- Slide cutting: Glide the blades down a section to thin and shape it.
- Scissor over comb: Use a comb as a guide to blend short areas.
Take your time. Scissor cutting rewards patience. If you rush, you will see steps and gaps. If you go slow, you get a flowing, lived-in shape.
How to Cut a Mullet Haircut at Home

Cutting at home is possible if you plan well. Set up in a bright room with a large mirror. Use a second hand mirror to see the back. Drape a towel around your shoulders. Have your tools within easy reach.
Work in clean, damp hair. Clip the back hair out of the way first. Cut the front, then the top, then the sides, and finally the back. This is the same order from earlier. It keeps the process simple and safe.
Here are the main rules for a home cut:
- Go slow and take off small amounts.
- Take photos of your plan and the finished look.
- Check your work in a good light.
- Do not cut when you are tired or in a rush.
- Stop if something feels wrong.
If you have never cut hair before, practice on a friend or a mannequin first. Or ask a friend to help with the back. Another pair of eyes catches mistakes you cannot see.
How to Cut a Mullet with Clippers

Clippers are great for the sides and neckline. They make clean, tight lines fast. A mullet with sharp, shaved sides looks bold and modern. Use clippers for the short zones and scissors for the long zones.
Start with a guard that is longer than you think you need. Run the clippers upward in the direction of growth. Use light pressure and keep the clippers flat. If you want a fade, use a long guard at the top of the sides and a short guard near the ear.
Follow these steps for the sides:
- Put on a longer guard, such as a number 3.
- Clip from the ear up to the temple.
- Switch to a shorter guard near the bottom for a taper.
- Blend the line with a comb and the clipper edge.
- Clean up around the ears with the bare blade if needed.
Never use clippers on the long back section unless you want it very short. Clippers cut everything to one length, and that kills the layered look. Keep them on the sides only.
How to Cut a Mullet for Beginners

If you are new to cutting, simplify the plan. A beginner mullet does not need a dramatic shape. A softer, longer version is much easier to control and fix.
Pick one length for each zone and stay close to it. Make the contrast between sides and back small at first. A mild mullet is forgiving. If you mess up, it still looks like a style choice.
Beginner tips that really help:
- Start longer than you want. You can always cut more.
- Use a comb to guide every cut.
- Cut one small section at a time.
- Avoid tight fades for your first try.
- Watch a few tutorials and pause to copy each move.
A beginner also benefits from checking the cut often. Dry the hair, comb it out, and look from every side. Small fixes at this stage save big headaches later.
How to Cut a Mullet on Straight Hair

Straight hair shows every line. That makes it the hardest type to hide mistakes on, but also the easiest to shape cleanly. A bad snip is easy to see, so go slowly.
Straight hair does not hide steps well. You need extra blending. Use point cutting and slide cutting to soften the lines. Add texture with thinning shears so the cut does not fall flat. Straight hair also tends to look heavy, so remove bulk from the back.
Tips for straight hair:
- Add layers to avoid a flat, heavy look.
- Point cut the ends for a softer finish.
- Use a texturizing spray to add grip and movement.
- Blend well where the zones meet.
Straight hair has little spring, so it will not shrink much when dry. That means what you see wet is close to what you see when you get dry. This makes planning easier.
How to Cut a Mullet on Yourself Male

Cutting your own mullet as a guy is doable. The main challenge is the back, since you cannot see it. Use a handheld mirror and a bathroom mirror together. Or take photos of the back with your phone to check the line.
Start with the sides. Use clippers with a guard and work around the ears. Then do the fringe and top with scissors. Leave the back for last, and be careful. Ask a friend to help with the back if you can. It saves a lot of stress.
A few smart habits for self-cutting:
- Section the back hair with clips so you can see what you cut.
- Cut the back in small steps and check each side.
- Keep the back a little longer than your plan.
- Use a neck trimmer for a clean edge, if you have one.
Guys with beards should match the sides to the beard length. A tight side with a long beard looks balanced. A long side with a trimmed beard can look messy.
How to Cut a Mullet Curly Hair

Curly hair makes a gorgeous mullet. The curls give the cut natural volume and movement. But curly hair needs a different method. The main rule is to cut it dry, or at least in its natural curl pattern.
Curly hair shrinks a lot when it dries. A curl that is six inches long wet may only look three inches long dry. If you cut wet, you can end up much shorter than planned. Cut it dry, one curl at a time, so you see the true shape.
Work with the curl, not against it. Cut small sections and let each curl fall naturally. Do not pull the hair straight. Leave extra length at the back to allow for bounce. Use sharp shears to avoid frizz and split ends.
Tips for curly mullets:
- Cut dry, or damp with curls defined.
- Leave extra length to allow for shrinkage.
- Shape the outline in a rounded form.
- Moisturize with a curl cream after cutting.
A curly mullet often looks best with a rounded edge and soft layers on top. This keeps the shape clean without flattening the curls.
Disconnection Height Changes the Whole Character of the Cut

Disconnection is the point where the short sides and top meet the long back. It is the “break” in the mullet. The height of this break changes how the whole cut looks. A small shift of one inch can change the cut from soft to bold.
A high disconnection starts near the crown. The back stays long and starts high on the head. This gives a dramatic, punk look. It makes a strong contrast and draws attention to the back. It also takes more bravery to wear.
A low disconnection starts near the ears or lower. The short zone is smaller, and the back is shorter overall. This gives a calm, wearable look. It feels more like a trendy shag than a classic mullet. It also grows out more easily.
| Break Height | Look | Effort to Maintain |
| High (near crown) | Bold, dramatic, punk | High, needs trims often |
| Mid (at the ears) | Classic, balanced | Medium |
| Low (near nape) | Soft, subtle, modern | Low |
To find your break, hold a comb flat at the spot where you want the change. Look in the mirror. Move the comb up or down until it feels right. Then mark that spot with a clip. This gives you a clear line to follow.
Choose your height based on your lifestyle. If you work in a formal office, a low break is smart. If you want a statement, go higher. You can always raise the break later as the hair grows.
Face Shape Changes Where the Break Belongs, Not Whether You Can Have One
Anyone can wear a mullet. Face shape does not decide if you can have one. It only helps you decide where to place the break and how long to leave each zone. The right placement flatters your features and balances your face.
Here is a quick guide by face shape.
| Face Shape | Best Break Placement | Style Tip |
| Round | Higher break, longer top | Adds height and length to the face |
| Oval | Almost any placement | The most flexible shape |
| Square | Mid break, soft layers | Softens strong jawlines |
| Heart | Lower break, fuller back | Adds weight near the chin |
| Long | Lower break, fuller sides | Avoids adding more height |
For a round face, add height at the top and keep the sides tighter. This makes the face look longer and slimmer. A side-swept fringe also helps.
For a long face, avoid too much height. Keep the top flatter and the sides fuller. A fuller fringe can shorten the look of the face.
For a square face, soft layers and a curved back soften the corners. For a heart-shaped face, a fuller back gives balance to a narrow chin.
Remember that these are guides, not rules. Hairlines, ears, and neck length all matter too. Try on the plan in a mirror or with a photo app before you cut. If you can, ask a stylist for advice.
Texture Changes the Method, Not the Shape
Hair texture does not change the mullet shape. It changes how you get there. Straight, wavy, curly, and coily hair all need slightly different techniques. The goal stays the same. You want four zones, a clean break, and a soft blend.
Here is how each texture changes the method.
| Hair Texture | Cutting Tip | Watch Out For |
| Straight | Use texturizing, blend well | Flat, heavy back |
| Wavy | Cut damp, keep the wave pattern | Uneven drying |
| Curly | Cut dry or curl by curl | Shrinkage |
| Coily | Cut dry, leave extra length | Extreme shrinkage |
Wavy hair sits between straight and curly. It holds shape well and has some natural body. Cut it damp so you can see the wave pattern. Add layers to avoid a triangle shape.
Coily hair has the strongest shrinkage. It can shrink by half or more. Cut it dry and stretched only a little. Leave extra length and shape it in sections. Use sharp shears for clean ends.
Fine hair needs more care. Too many layers can make it look thin. Keep the layers light and the back a little blunt. Thick hair needs more thinning, but not too much.
A good trick for any texture is to test one small section first. Cut it, dry it, and see how it behaves. That tells you how the whole head will react.
When Cutting a Mullet at Home Is a Bad Idea
Home cutting is fun, but it is not always smart. Some situations call for a pro. Knowing when to step back can save you weeks of regret and a lot of awkward hair.
Think twice about a home cut if any of these apply:
- You have never held shears before.
- Your hair is very curly or coily and you want a precise shape.
- You are changing from a very short cut to a dramatic mullet.
- You have an important event coming up soon.
- You plan to bleach or color the hair at the same time.
- You want a sharp fade or a detailed design.
A hair cut mistake can take months to fix. Short sides do not grow back overnight. A back that is too short ruins the whole mullet. If you are unsure, play it safe.
A smart compromise is to let a pro set the shape and do the home maintenance after. Pay for the first cut. Then keep the shape with small trims between visits. This gives you the best of both worlds. It saves money and avoids big errors.
If you do go ahead at home, keep one rule in mind. Cut less than you think. You can always remove more hair, but you can never add it back.
What to Tell Your Stylist or Barber

A good conversation with your stylist makes a big difference. Many people just say “give me a mullet.” That is too vague. Mullets come in many styles, and your stylist needs details to give you the look you want.
Bring photos. Show at least two or three pictures from different angles. Pick photos of hair that looks like yours in texture and color. A photo of a curly mullet will not help if you have straight hair.
Then explain the key details. Use clear words. Here is a simple script you can follow:
- Fringe: “I want the front to hit at my eyebrow, with a soft edge.”
- Top: “Keep some length on top for volume and texture.”
- Sides: “Make the sides tight or over the ear.”
- Back: “Leave the back long, about shoulder length.”
- Break: “I want a mid-height break, near the ears.”
Also share your daily routine. Tell them how much time you spend on your hair. Mention if you wear it tied up, or if you work in a place with a strict dress code. This helps them tailor the cut to your life.
Ask questions too. Ask how to style it, which products to use, and how often to trim. A good stylist will explain the plan and show you how to keep it fresh. If they seem unsure about mullets, find someone who does them often.
Finally, speak up during the cut. If something looks too short, say so right away. A good stylist will welcome the feedback.
Maintenance and Grow-Out by Zone
A mullet needs regular care. The short zones lose their shape faster than the long ones. Most people need a trim every four to six weeks to keep the look sharp. If you wear a tight fade on the sides, you may need a touch-up every two to three weeks.
Each zone grows at its own pace and needs its own plan. Treat them one at a time.
| Zone | Trim Schedule | Care Tip |
| Fringe | Every 4 to 6 weeks | Trim to keep it out of your eyes |
| Top | Every 6 to 8 weeks | Add texture to keep shape |
| Sides | Every 2 to 4 weeks | Re-do clipper work often |
| Back | Every 8 to 12 weeks | Dust the ends to avoid splits |
The sides lose shape first. Even a quarter inch of growth can blur the contrast. Keep these clean and tight if you want a bold look.
The back can grow long and healthy with little work. Dust the ends every couple of months. This means trimming just a tiny bit to remove splits. Use a good conditioner and avoid too much heat.
Daily styling is simple. Use a light cream or sea salt spray for texture. Use a bit of paste on the top to add shape. Blow dry the top upward for lift. Let the back air dry for a natural flow.
If you want to grow out a mullet, plan ahead. Start by letting the sides grow first. Keep the back trimmed to avoid splits. Use a stylist to blend the layers as they grow. Over time, the zones will merge into one length. The awkward stage lasts around three to four months. Use headbands, clips, or a short tuck behind the ears to get through it.
Frequently Asked Questions
How long does hair need to be for a mullet?
You need about 4 to 6 inches in the back for a clear mullet shape. Shorter hair can work for a mini mullet.
What tools do I need to cut a mullet at home?
You need sharp shears, a fine comb, clips, and a spray bottle. Clippers help with the sides but are optional.
Can you get a mullet with thin hair?
Yes. Keep the layers light, keep the back slightly blunt, and use texture spray to add body and thickness.
How often should I trim a mullet?
Trim the sides every 2 to 4 weeks and the rest every 4 to 8 weeks. This keeps the shape sharp and clean.
Is a mullet good for round faces?
Yes. Add height on top and keep the sides tighter. This gives the face a longer, slimmer look.
Final Thoughts
A great mullet comes from a clear plan. Think in four zones. Cut from front to back. Use low tension in the back and blend away every hard corner. Adjust the break height, face shape, and hair texture to fit you. These simple ideas turn a scary haircut into an easy one.
Whether you cut it at home or sit in a barber chair, take your time. Cut less than you think. Check your work often. And remember that hair grows back. A mullet is meant to be fun, bold, and a little rebellious. Wear it with confidence.

Jasper Cole is a content writer and researcher at Faxhion Infoz, focusing on hair care, hairstyles, styling ideas, and hair related topics. He researches information from reliable sources and presents practical insights in simple language. His goal is to help readers better understand hair care and make informed everyday choices.